Title

A little blog about food with recipes, reviews, commentary, and honesty.

I also offer event catering and private chef services; check out Earls Barton Eats! for more details.

Tuesday 29 January 2013

Prawns with Apple, Fennel, and Sesame


Pfft. That's the kind of noise I make when I think about eating prawns. Prawns kind of bore me. I think it's because they are usually only offered in three ways: on a skewer, in a batter, in a cocktail sauce. And I don't know about you but I actually like tasting the PRAWN, not the chargrillling/batter/can we even call it a sauce? 

So because I like tasting the prawn I made this; a dish with prawns that tastes like prawns. The other ingredients are all there to enhance the delicate meatiness of the said prawns and to give a extra crunch. This dish is light and fresh; perfect as a starter or bulked out with leaves to form a salad. 


Ingredients to serve 2: 

180g of king prawns, raw and peeled
1/2 a green apple (I used Granny Smith as it's a tangy, crispy variety)
2 tsps of sesame seeds
1/2 tsp of fennel seeds
2 tbsps of extra virgin olive oil
1 tbsp of lemon juice
Pinch of sea salt

Firstly toast the fennel seeds in a dry pan over a medium heat until you can smell the fennel aroma and the seeds start to pop; transfer the seeds into a pestle and mortar and bash up until a powder. Next toast the sesame seeds, again in a dry pan over a medium heat, until golden and transfer to a clean bowl when done. 

For the dressing mix the ground fennel, olive oil, lemon juice, and salt in a bowl. And erm, that's it. 

Core the apple and slice into fine julienne; don't bother peeling. Cook the prawns in a dry pan, without any oil, for 2 minutes on each side until the prawns are pink and firm to the touch. 

To serve pile the prawns onto a plate and assemble the apple julienne on top. Drizzle over a couple of tbsps of the dressing and finish with a sprinkling of sesame seeds. 


Friday 25 January 2013

Interview with Tom Kerridge


Tom Kerridge is the chef owner of The Hand and Flowers in Marlow, Buckinghamshire. The Hand and Flowers is unique as the first pub to be awarded 2 Michelin Stars for it's food. Tom has worked in professional kitchens since 1991 in Gloucestershire, London, and Norfolk, and has worked for culinary legends such as Gary Rhodes and Phillip Britton. Fast becoming a culinary legend himself, Tom also appears regularly on television and on Twitter @ChefTomKerridge. 

And he also agreed to have a quick e-chat with me... 


If there is one thing (ingredient/equipment/expert tip) that no home cook should be without, what would it be?

Treat all ingredients with respect and they will respect you back. 


You've been a vocal advocate for cheap cuts of meat; what's your favourite cut and the best way of cooking it?

Pork belly; cooked at 70 degrees for 8 hours, pressed and chilled then regenerated on a plancha to crisp up the skin.


How does your shellfish allergy affect your cooking and approach to development in the kitchen?

It has no effect, I know what they all taste like, I have tried them all, and I have built a great team around me without allergies!


In 2011 The Hand and Flowers was awarded it's second Michelin star; what does the recognition mean to you and your staff?

It is a huge achievement to be the first and only pub have achieved two Michelin stars, showing that good food can be served in an environment that is much more user friendly. The culminations of 25 years being a chef on my part and a huge amount of enthusiasm and hard work from all my fantastic staff.


You're an active Twitterer; why do you use it?

I use it because, as a modern day chef and member of the hospitality industry, you need to embrace and recognise all types of media, TV, radio and social media, as people want to know what you think and you need to be seen actively embracing all types of correspondence.


What has been the greatest influence on your food?

Simplicity and flavour.


What's next for Tom Kerridge?

Maintaining what we have, using it as foundation to perhaps build a bigger business using and encouraging the staff that we have here to grow with us in an organic, strong route of progression.


Monday 7 January 2013

Trend Aware for 2013, Part 3: Doughnuts


And onto the doughnut; the deep-fried drop of bread-ish excess. 

This is the doughnut in it's spherical, jammy guise, not the sickeningly glazed, holey format. Although the ring doughnut has seen a resurgence in popularity in recent years, it is the ball-like version which is taking 2013 by storm. 

They've already been established as a dessert on Michelin menus across the land; a cutesy nod to childhood (who out there doesn't have at least one childhood memory of biting into a hot, sugary doughnut? I have at least a dozen). Even in my local, excellent restaurant The Red Lion at East Haddon doughnuts are served with jam and custard dipping sauces, splendidly nostalgic in their paper bags. Although it's not looked upon too fondly by serving staff if you play the 'don't lick your lips' game whilst dining on them. 

Again tapping into the junk food trend which will be a recurrent theme for the next couple of years at least, the doughnut has always had the reputation of being quite lowly; probably all those years of them being served out the back of mobile carts. So their transition from that to Michelin kitchens gives me a nice cosy feeling inside, although seasoned with a dash of cynicism for the time when they'll be 'out of favour' again. 

Doughnuts are made from a yeasty dough so they do take a bit of time, what with proving and all, to do but they're perfect as a naughty snack or for impressing your friends with your Michelin credentials at a dinner party. My recipe is adapted from the excellent Word of Mouth blog by Felicity Cloake in the Guardian; read it, you'll not regret it. I find that raspberry jam works best because it's tartness cuts through the richness of the dough, but you can use any other flavour of jam (or custard) as you'd like. And of course you can either fill the doughnuts, as I have, or serve the jam on the side a'la The Red Lion. 


Ingredients to make 8 doughnuts: 

160g of strong white bread flour
7g (1 sachet) of dried yeast
1/2 tsp of salt
15g of caster sugar, plus extra for dusting afterwards
20g of unsalted butter
65ml of whole milk
45ml of water
1 egg, beaten
Vegetable oil, for frying
Raspberry jam (unseeded)


To start with put the butter, milk, and water into a small saucepan and heat gently until the butter is melted and the liquid is warm; not hot. Then mix the flour, yeast, salt, and sugar into a large bowl and mix together. Pour the warm liquid mixture into the dry ingredients, add the beaten egg, and stir together with a spoon until the mixture binds and becomes a soft dough. 

Lift the dough out of the bowl and press it together firmly into a ball in your hands then put it onto a clean, lightly floured surface and begin to knead. You can use the same kneading method that I explained here as the dough is a very similar texture. You will need to keep flouring the surface for the first couple of minutes of kneading as the dough will be a bit sticky, but soon it will become smooth and silky and it'll be OK without. Keep kneading for about 10 minutes until the dough is smooth and elastic; a good test is to press the dough lightly with your fingertip, if it bounces back it's ready. 

Lightly grease a large (and I mean large, the dough is going to grow...) glass bowl with a little butter. Form the dough into a ball and place in the bowl, covering with a damp teatowel. Place the bowl in a warm place to prove for about an hour until it's doubled in size. If you lack an airing cupboard do what I do and place the bowl under a warm radiator. 


When the dough is ready remove it from the bowl and divide up into 8 equal portions; the easiest way to do this is to divide the dough into 2 parts, then divide each part into 2, then each of those parts into 2. Roll each portion into a ball and place on a lightly floured baking tray or wooden board, spacing well apart, covering again with a damp teatowel. Put the tray or board back into a warm place and leave for about 45 minutes for the portions to double in size. 

Heat the vegetable oil in a deep fat fryer (this is the safest way to fry the doughnuts; if you don't have one you can use a medium saucepan) to 160c. This may seem low but you need to cook the doughnuts all the way through before they brown too much on the outside. When the portions have risen again remove them from the board and cook them in batches of 4 until the outsides are golden brown (about 5-6 minutes). Remember to carefully turn the doughnuts over halfway through cooking using a metal spoon or tongs so that they brown evenly, otherwise it looks as if they have tan-lines. 

Take a deep baking tin and sprinkle with a layer of caster sugar. When the doughnuts are cooked remove them from the fryer, spread them out on kitchen paper to blot the excess oil for about a minute, then transfer them to the sugary tin while they're still hot. Roll the doughnuts around in the sugar by shaking the tin, making sure they're fully coated, then remove them onto another tray or large plate. 


You can now leave the doughnuts to cool for a few minutes before filling them with jam as it's easier when they're not molten-hot. It's easiest to fill them using a piping bag, but you can use a teaspoon if you're deft. Take the doughnut in one hand and make a small cut  (about 1cm) with a sharp knife into the base (they will naturally gain a bit of a flat bottom). Prepare a piping bag with a small round nozzle (big enough for the jam to pass through and to fit in the hole you've cut in the doughnut) and spoon in a couple of tablespoons of cold jam. Squeeze the doughnut gently so that the cut you made opens up into a small hole and press the piping nozzle into it. When the nozzle is inside you can start squeezing the jam (hello there, sexy euphemism), stopping when the jam begins to leak out. 


When you've filled all the doughnuts you can serve them warm or cold, and in a paper bag if you're feeling fancy. 


Saturday 5 January 2013

Trend Aware for 2013, Part 2: Chinese Steamed Buns


You'll hopefully have guessed by now that the main food trends of 2013 are basically rehashed, re-released, or reinvented classics made trendy again through 'buzz'.

So to the Chinese steamed bun, a revival of a Cantonese recipe and technique that's a good few hundred years old. 

But of course it's been 'modernised' (what does that even mean, I ask you?); where a traditional cha sui bao has the filling stuffed inside the roll, kind of like a meaty dumpling, the trendy Chinese steamed bun uses the bun, well, like a bun, and has the filling added afterwards. 

The buns are becoming a major craving for street foodies, particularly with the most famous retailer, Yum Bun in Broadway Market, being the subject of rave reviews and critic's write-ups all over. You couldn't have opened a January edition of any food magazine without seeing them mentioned in some context. 

Chinese steamed buns, unlike the gourmet hot dog or forthcoming doughnut, are also pretty darn healthy; ideal for post-festive cleansing. That is so long as you fill them with lean meat and vegetables, rather than lard and brown sugar. Tempting... 

So for a soft, light, mouth-watering taste of China head to Broadway Market, or if you've got 3 hours to spare (yeah, sorry about that) make your own at home. 

Other than copious amounts of time, the only specialist equipment you'll need is a bamboo steamer. You could use a metal one or a steaming plate but the bamboo steams the buns more reliably and evenly.


Ingredients to make 4 large buns: 

280g of plain flour (I used '00' for an extra light bun) 
35g of caster sugar
7g of dried yeast (1 sachet) 
1/2 tsp of salt
1 tbsp of vegetable oil 
Warm water (Not hot, you should be able to comfortably hold your finger in it)


Firstly you need to make a mini starter, or a pre-ferment, just to get the yeast going. In a large glass bowl add 4 tbsps of the flour (about 60g), the yeast, 1 tsp of the caster sugar (about 5g) and 4 tbsps of warm water and mix together so that it resembles a loose dough. Cover the bowl with a damp teatowel and leave in a warm place (I lack an airing cupboard and so put my yeasty doughs under the radiator in the kitchen) for 30 minutes. When it's done it'll be puffed up, full of air holes, and smell a bit like beer. 

It's alive, ALIVE!

To this mixture you can then add in the rest of the flour and sugar, the salt, and the vegetable oil and mix together. Then gradually pour in enough warm water to bind all the dry ingredients together and form a dough (roughly 1 cup). 

When the mixture is binding together take it out of the bowl and press it together with your hands so that it forms a ball, then knead it together on a clean, lightly floured surface. Everyone has their own methods of kneading but I favour stretching the dough out away from me with the heel of my palm then folding it back over, turning it 90 degree and repeating. You'll have to knead for about 10 minutes for the dough to become smooth, silky, and elastic. You'll need to flour the surface for the first 2-3 minutes of kneading as the dough will still be a bit sticky, but after that it should be OK without. 

Now take a large (and I mean large, the dough is going to grow) clean (i.e. not the one you used to mix the dough in) glass bowl and lightly oil the inside, right the way up to the top. Place the now-kneaded dough in, cover with the teatowel, and put somewhere warm again. This is the bit that takes a while; your dough will need to prove for about 2 hours, until it's tripled in size and is pillowy soft and airy. 

Before...

After... 

When it looks a bit like the above you can tip the dough out of the bowl and onto a lightly floured surface. At this point you'll be able to feel how light and soft the dough is. Now you need to knock the dough back; literally punch it flat all over until the air has been knocked out. Then you need to knead it again for around 5 minutes until it's formed back into a soft ball. 

Take a length of greaseproof or baking paper and cut in into large squares (about 10cm square). Cut the dough into equal quarters and roll each part into a ball, then place each ball onto a square of paper. Cover all the balls with a damp teatowel and leave for about 30 minutes (yes, again...) until the balls have doubled in size. 


Pour some cold water into a wok (about 3cm deep) and bring the water to the boil on the hob. When the water's boiling (NOT BEFORE ON PAIN OF DEATH) place the bamboo steamer on top and then place the buns, still on their paper bases, inside and put the lid on top. I use a 20cm steamer and 1 bun will fit on each of the layers. Turn the heat down to a medium so that the water is still boiling but not fiercely (otherwise it'll boil away before the buns are cooked). 

Steam the buns for 15 minutes; when they're done they'll still be pale in colour but will have a shiny surface and will be firm to the touch. Remove the lid from the steamer and then remove each steamer layer from the wok and set aside on a surface to cool. Don't leave the lid on the steamer while the buns are cooling; the dripping condensation will cause the buns to blister. Be careful when doing this as the steam will be ferociously hot. 


Leave the buns to cool for a couple of minutes before attempting to cut them open, and when you do cut them open use a serated knife and be gentle, otherwise you'll rip the dough. Inside the buns should look just like good bread; full of air and soft to the touch. 


Now your buns are (finally) ready to fill with whatever filling you like; I filled mine with sliced chicken breast cooked in oyster sauce and ginger, and raw carrot, cucumber, and spring onion cut into julienne. 


And believe me, they're even tastier than they look. 


Trend Aware for 2013, Part 3: Doughnuts, out on 07.01.13


Thursday 3 January 2013

Trend Aware for 2013, Part 1: Gourmet Hot Dogs


I once read these referred to as "Haute Dogs", which made me throw up in my mouth a little bit. 

The hot dog neatly combines two of the biggest umbrella food trends of the last couple of years: junk and street. The same process has already been completed with the humble burger (have you walked down a high street recently without seeing at least one gourmet burger joint?) and is still ongoing for fried chicken. 


This trend isn't about thrown-together barbecue bangers but about using quality ingredients with an emphasis on flavour. It's about taking the pedestrian sausage to another level. And of course it opens up the opportunity for endless twee themes and ridiculous names; 'The Big Pimp' and 'The Dogfather' being two such examples. 

The new 'spin' on hot dogs is simply a high-quality sausage that isn't sourced from a tin (I've used Bavarian Frankfurters but also experiment with bratwurst, bockwurst, vegetarian, or even chorizo), bread which isn't the normal fluffed up finger roll (I used soft submarine rolls, but try continental and seeded breads too), and toppings which vary between sophisticated gourmet and calorific comfort-food. 

The range of toppings is absolutely huge and only limited by your own imagination, so you can build a hot dog to suit any taste. Except for those who dislike hot dogs. Plus it can involve as much or little cooking as you'd like; 'building' is an apt term. 

Below I've included 3 gourmet examples for you to have a butchers at, with a couple of recipes included at the end if you want to do more than open a jar or squeeze a tube. 


The Mexican


Only 6 elements: Frankfurter, submarine roll, tomato salsa, guacamole, sour cream, fresh jalapeƱos. And one that you can do without any cooking at all with salsa, guacamole, and sour cream all being readily available in squeezy tubes and jalapeƱos from a jar. If you fancy having a go at the salsa and guacamole, the recipes are available at the bottom of the page. 
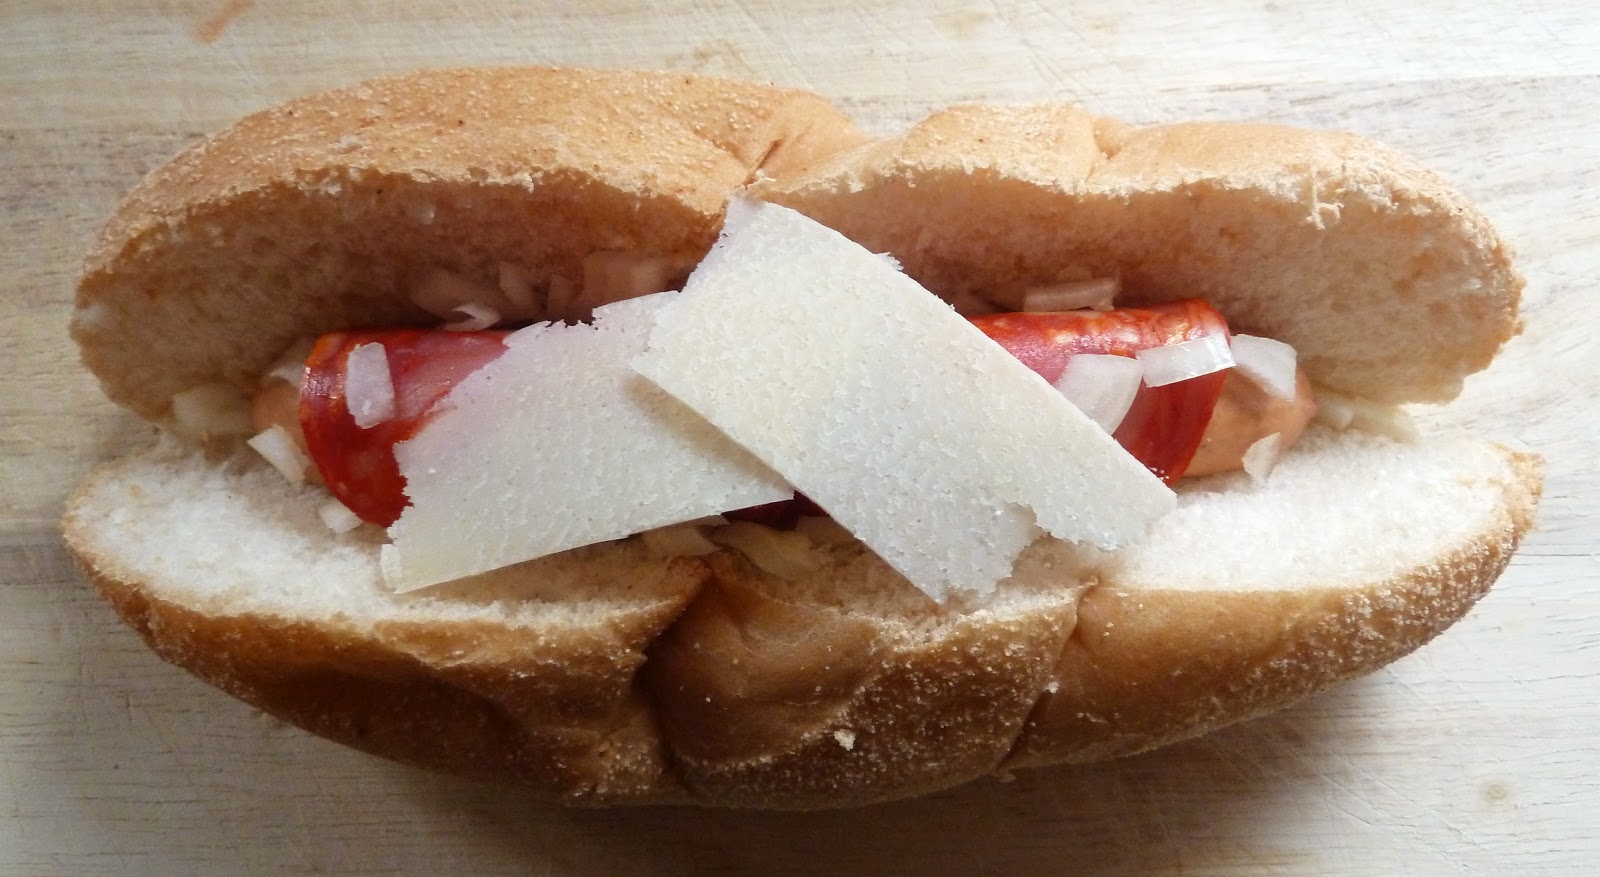

The Spanish


Even simpler than before: Frankfurter, submarine roll, fried chorizo, raw diced white onion, and shavings of Manchego. Buy the chorizo ready-sliced for even less work. 


The Classic


If you haven't heard of a chilli-cheese dog then you can leave right now. The Frankfurter is topped with spicy beef chilli and a slice of Monterey Jack cheese. You can either source your chilli ready-made or follow the recipe at the bottom of the page for my ultimate beefy chilli. 


Easy Tomato Salsa

Ingredients, enough to top 4 hot dogs: 

110g/4 oz of fresh tomatoes, de-seeded and diced. 
1/2 a red onion, diced
1 green chilli, de-seeded and finely diced
Zest and juice of 1 lime
1 tbsp of fresh coriander, chopped

It's called easy for a reason; simply combine all the ingredients in a bowl, stir together, and serve! 


Guacamole

Ingredients, enough to top 4 hot dogs: 

2 ripe avocados; peeled, de-stoned, and the flesh mashed
2 fresh tomatoes, de-seeded and diced
2 red chillies, de-seeded and diced
1/2 red onion, finely diced
Juice of 1/2 lime
Salt, to taste
1 tbsp of fresh coriander, chopped 

Yet another easy one; pound together the tomatoes, chillies, onion, and coriander to a paste in a pestle and mortar or food processor. Combine with the lime juice, salt, and mashed avocado and serve straight away. 


Ultimate Beef Chilli

Ingredients, enough to top 4 hot dogs: 

250g of extra lean steak beef
1 can of chopped tomatoes in juice (400g) 
1 beef stock cube
1 white onion, diced
1 fat clove of garlic, crushed then finely chopped
1 tsp of dried crushed chillies
1 tsp of ground cumin
2 tsps of smoked paprika
1 tsp of dried oregano
1/2 red pepper, diced
1 red chilli, de-seeded and diced
Salt, to taste
2 tbsps of fresh coriander, chopped
Vegetable oil

First cook the onions in a little oil on a medium heat until soft, then add the garlic and red chilli for 1 minute. Then turn the heat up and stir in the dried ingredients; the dried chillies, cumin, paprika, and oregano. Fry together for a couple of minutes, add the mince and cook until the meat is browned. Stir in the tomatoes and red pepper, add the stock cube, and then simmer for 30 minutes until the sauce is reduced. Finish by stirring through the coriander and serve while hot. 


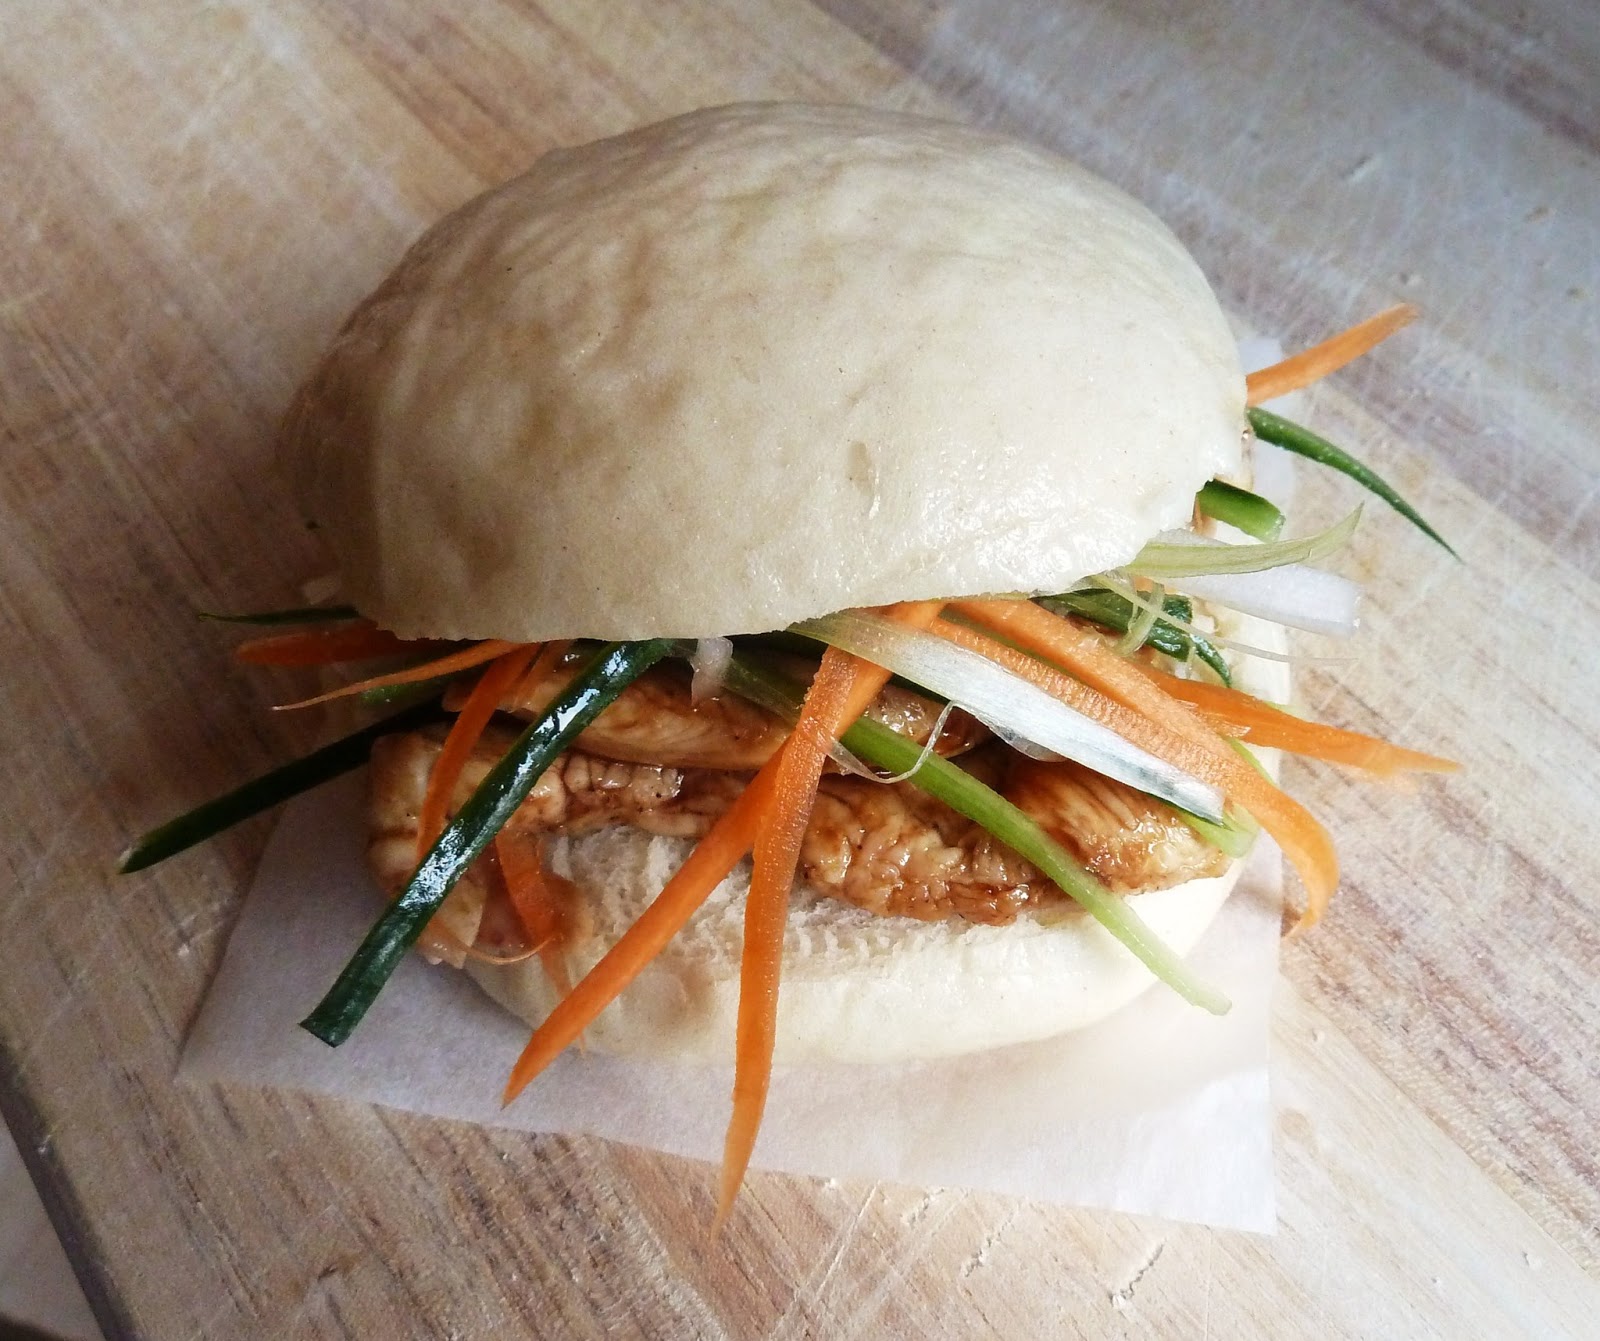
Trend Aware for 2013. Part 2: Chinese Steamed Buns - out on 05.01.13.