Title

A little blog about food with recipes, reviews, commentary, and honesty.

I also offer event catering and private chef services; check out Earls Barton Eats! for more details.

Sunday 30 December 2012

Trend Aware for 2013: Intro


I believe I've expressed in a previous blog how intolerant I am to trends of any variety; be they food, or drink, or clothes, or authors, or dishcloths. I've never been a very 'trendy' person, even as a child I shunned the furbies and the tamagotchis and the pogs (and ultimately, friends). I haven't really put a lot of thought into why: maybe I'm just a contrary bastard, maybe I'm too cool, maybe I just can't be bothered with it all. 

We could go deep into the psychology of why some of us are compelled to worship the trendy and the popular and the new. Or I could not and we'd all be thankful for it. 

You see, I eat what I like when I damn well like. And I sort of resent being told that I have to go and eat something because it's IN or HIP or NOW. If you want to try something new then go out there and try it; whether it's the very latest in food-fashion or it's something your granny used to cook. I appreciate that sometimes we need a little nudge in the right direction, but please don't let yourself only be influenced by me (Lord, help you), or another blogger, or a journalist; be influenced by your own taste-buds and curiosity. 

And ultimately I feel very sorry for the foods who are deemed to be uncool or old-fashioned and I want to give them a little hug. In 2013 the utterly excellent macaroon is meant to make way for the not-so-elegant eclair. And fabulous, fresh noodle bars are being trounced by pie 'n' mash shops (the 'n' is somehow obligatory). 

Good food is for life, not just for trends. 

Then why, you must surely be asking, am I writing a series of blogs about the food trends of 2013? Well partly because, as I said before, I'm a contrary bastard. But mostly because they are foods that deserve a spotlight; not because they're HAPPENING but because they're really very good. 

Knowing about the latest food trends gives you an awareness of the variety of food that's out there; you can be trend aware without being a trend follower (or so the hipsters tell me). If you want to give them a go then do, if you glean some new ideas from them then excellent, but don't rush out on the next train and spuff half your month's wages in some hipster cafe in the East End because of a compulsion for keeping up with the Joneses. 

And no, I'm by no means the only food blogger who will be writing capaciously on this subject. But I may be the only one thinking more about the food than my own popularity. 

Don't fret, the rest of the year will be dedicated to unfashionable, dull, boring, brilliant, delicious food. 


Trend Aware for 2013, Part 1: Gourmet Hot Dogs - out on 03/01/12.

Friday 21 December 2012

A Clichéd Christmas: Festive Party Nibbles


Onto another Christmas food cliché; the party nibble. For parties too drunken for them to be called 'canapés' and too aspirational to be called mere 'snacks', the 'nibble' is in all your faces at this time of year.  

The rules of party nibbles are such: they have to be small enough to eat in one bite or two, they're much cuter if they are in fact 'mini' versions of big food (OMGZ LOOK, IT'S MINI!), and the more bling the better. My party nibbles tick every box.

Throughout December you will be bombarded with glitzy TV adverts for supermarket party foods and, no doubt, be blinded with a vast array of foodie blog posts about them. But in this post taste is paramount, and relative ease for maximum nibble-osity is key.

(I say this post is about party nibbles, but frankly you can stuff your face with them all sat in front of the TV with your pyjamas for all I care.)


Mini Muffalettas

Full-size muffalettas are an iconic sandwich with it's origins in the Italian community of New Orleans. This nibble doesn't even need cooking; it's all in the assembly. See how good I am to you? 

Ingredients to make roughly 24:

1 square loaf of focaccia (you can use plain or any flavour, but I think slow-roasted tomato works best) 
3 slices of Emmenthal cheese
9 slices of salami Milano
8 slices of montadella
Baby spinach leaves
Roasted red pepper chutney (I use Tesco Finest)

Firstly to get the best shape trim the crusts off all four edges of the focaccia, and then slice in half through the centre to create one giant sandwich. 

Smother 3-4 of tablespoons of chutney over the soft side of each slice of focaccia, then cover the bottom slice with the baby spinach leaves. Then add two layers of the montadella (4 slices should completely cover the bread), followed by one layer of the Emmenthal, and finally one layer of the salami Milano. Top with the other slice of focaccia. 

Place the entire focaccia onto a solid board and cover with a length of clingfilm. Then put another board on top of the focaccia and weight down with a couple of tins. Leave this for at least 2 hours, or overnight if you have time, in order to squash the fillings together and prevent the muffalettas falling apart when cut up. 

When it's been sufficiently squished together remove the weights, board, and clingfilm and use a large knife to cut into small squares (about an inch square) and finish by piercing with a cocktail stick (for both practical and pretty reasons). 


Quail Scotch Eggs with smoked bacon

More OMGZ mini food now, but with a smoky bacon-y twist. 

Ingredients to make 12: 

12 quail's eggs (to make this even easier use ready-hard boiled and peeled eggs, available at Waitrose)
400g of sausage-meat
4 rashers of smoked back bacon
Oregano
Salt and pepper
120g panko breadcrumbs (they're crispier than normal)
2 eggs, beaten 
4 tablespoons of plain flour
Vegetable oil, for deep frying

If you haven't taken my excellent advice or can't source the ready-prepped quail's eggs, start by boiling the eggs in water for 3 minutes, then plunge into iced water immediately. When they're cool carefully peel them, remembering to gently rinse off any leftover shell, and set aside. 

Fry the bacon in a tablespoon of oil until it's cooked, but not crispy, then remove the bacon from the pan and drain on a couple of sheets of kitchen roll. When it's cooled dice the slices reasonably finely. At this point you should also preheat the oil to 190c - it's safer and quicker to do this in a deep-fat fryer, but if you don't have one use a deep, heavy pan. Also preheat the oven to 200c (180c fan). 

Mix the sausage-meat with the oregano, seasoning, and diced bacon - I prefer to do this with my hands so that the ingredients are well and truly mixed together (and it's delightfully messy). 

Now set out the flour on a plate, the eggs in one bowl and the breadcrumbs in another. Take a small handful of the meat mixture (about twice the size of the egg) and roll into a ball using your hands. Then flatten the ball, place the egg in the middle, and fold the meat around it. When the egg is entirely covered roll in your hands again to regain the ball shape. 

Roll the egg in the flour and pat off any excess, then coat completely in the beaten egg, and then drop into the breadcrumbs and roll it around until it's covered. Fry the egg for 3-4 minutes until it's golden and crispy, then remove from the fryer and place on a couple of sheets of kitchen roll to drain. 

When all your eggs are fried put them on a baking tray and finish in the oven for 5 minutes. When they're done, allow to cool and then serve cut into halves. 


Salted Caramel and Chocolate Tartlets

What am I forgetting? Oh yes - BLING. There are lots of ways to introduce the bling factor into your nibbles, but none as oozey or glam as these tartlets. 

Ingredients to make 12: 

320g of shortcrust pastry, ready-rolled (hey, it's Xmas, who wants to mess about with a rolling pin?)
200g of dark chocolate
175 of golden caster sugar
120ml of double cream
120g of butter, cubed (plus a little extra for greasing)
1/2 tsp of sea salt flakes
Gold leaf (for tarting up...) 

First preheat the oven to 200c (180c fan) and grease a 12-hole tartlet tray (the same you'd use for mince pies) with butter. Cut out circles of pastry with a pastry cutter that's slightly bigger than the diameter of the hole of the tray - this will ensure that the tartlet is the right shape and size. Place the pastry into the holes, prick the bottoms a few times with a fork, place a circle of greaseproof paper into each one, and finish with a few baking beans. Cook in the oven for 12 minutes, until crispy and cooked through. When they're done, remove from the tin and cool completely on a wire rack. 

In a heavy-bottomed pan gently heat the sugar with 3 tablespoons of water until the sugar is dissolved. Bring to the boil and then simmer for a couple of minutes until the syrup turns an amber, caramel colour (but don't stir!). Then carefully (it will spit) stir in the cream and salt, and then the butter. Leave aside to cool for a few minutes. While the caramel is cooling melt the chocolate in a glass bowl over a pan of simmering water. 

When the caramel has cooled, but is still liquid, spoon into the tartlet cases. Fill them about 3/4 full. Then set aside to cool and firm up for about 10 minutes.  

When the caramel has firmed pour over a small amount of the melted chocolate, making sure the surface is level and shiny. While the chocolate is still liquid use a cocktail stick to carefully place a couple of flakes of gold leaf into the centre. Then place the tartlets into the fridge so that the chocolate cools and solidifies. 

The finished tartlets will be oozey in the centre and crisp on top. 


Wednesday 19 December 2012

A Clichéd Christmas: Cherry Tomato and Sweet Chilli Jam


I don't want to get all 'Kirstie's Homemade Christmas' on you but every year I make food hampers as gifts. Partly because I'm eternally poor and partly because I really like sharing my recipes with people and making them food which makes them smile. I'm such a cliché. 

As someone who is allergic to trends, I realise this may seem a bit faddy of me. But, in all honesty, I GOT THERE FIRST. I've been doing food hampers for ions, before it all got twee and fashionable and everyone from Nigella to Kirstie Bloody Allsopp was doing them. Every year I include staple items, which year on year everyone loves, and also new recipes and things I just fancy trying out. 

My cherry tomato and sweet chilli jam is one of the staples; it's perfect with crackers and cheese on Boxing Day or as a burger relish on NYE. It's a tingling combination of sweet, sour, and hot. I made my first batch this very morning, proving that it's the perfect thing to make as a last minute gift. 

Because I'm making this recipe at Christmas I've used tinned cherry tomatoes; in the summer please feel free to use an equal quantity of fresh British cherry tomatoes but in the winter you won't get the same flavour so use tinned instead. 


Ingredients to make 3 medium (8oz) jars: 

800g of tinned cherry tomatoes in natural juice (2 cans)
2 tsps of coriander seeds
2 tsps of cumin seeds
3 cloves of garlic
2 white onions
5cm lump of ginger
2 red chillies
300g of soft light brown sugar
250ml of white wine vinegar
2 tsps of dark soy sauce (for GF use a gluten-free soy sauce or you can leave it out completely and use a teaspoon of sea salt instead)
Olive oil


Firstly you need to make sure you sterilise your jars so that they're ready to use straight away when the jam is done. You can do this by putting them in the dishwasher, or a quick way is to put a drop of antibacterial washing liquid in each jar, fill to the brim with boiling water, and then leave the water to cool in the jar. 


Next you need to toast the coriander and cumin seeds so that they develop their full flavour and fragrance. I do this by using a specialist Indian tadka pan over an open flame, but it's just as good to use a small frying pan on the hob. Toast the seeds dry, without oil, on a medium heat for a few minutes until you hear the coriander seeds start to pop. Then remove from the heat and leave to cool before bashing them into a powder using a pestle and mortar. 

The jam uses a paste, sort of like a curry, for the base of it's flavour. To make this you need the onions, garlic, ginger, and chillies. I find it best to peel then chop all the ingredients and then pulse them to a smooth paste using a small food processor. If you don't have one and you possess ninja knife skills you can just dice the onion and chillies really finely, crush the garlic cloves, and grate the ginger. Whatever method you use leave the seeds in one of the chillies, for heat, and discard from the other, for flavour. When you've made the paste fry it off for a couple of minutes in a large saucepan with a tablespoon of olive oil. 


Next add the tomatoes and their juices to the paste in the saucepan and simmer over a medium heat. After a couple of minutes the tomatoes will become soft and you can squash them against the side of the pan with a spoon to release the juices. If you're using fresh cherry tomatoes it's best to halve them before adding them to the pan. 

Next add the spice powder to the pan, which will immediately turn the tomatoes a darker colour. Then add the sugar and vinegar and stir altogether. Bring the pan up to the boil for a couple of minutes then reduce so that the mixture simmers. You need to leave the pan simmering so that the mixture reduces until it's a jam-like consistency; this will take about 30-35 minutes. When the mixture is reduced you can remove it from the heat and stir in the soy sauce (or salt, if using). 

To help preserve the jam and keep it sterilised you need to fill the jars immediately, whilst the jam is still piping hot. But remember to pour the water out of them first! If you're messy like me it's easiest to use a jar funnel to do this so that the jam doesn't get everywhere, but if you have a steady hand you can do it without. Use a ladle to spoon the hot jam into the jars, right to the brim, and immediately seal with the lid. 

Leave the jam to cool inside the jars before you label them or put the jars into additional packaging. 


Saturday 15 September 2012

The Big Survey


This is a great big alert klaxon to say that The Big Survey is now closed for entries! 

Thank you to everyone who contributed; your feedback was really important in setting up my catering business Earls Barton Eats!

The winner of the goody bag will be picked at random tomorrow morning by a neutral party and will be announced right here so stay tuned! 


Tuesday 4 September 2012

News!


Exciting times are ahead! 

My review of Mien Tay, Wellingborough is featured in the September issue of Barton Today and is now online! 

The Barton Today is a brilliant little village magazine, with a sizeable circulation of 6,000. 

It's the first rung on the ladder! 


Monday 3 September 2012

Ireland: The Emerald Isle of Pork


I wish Ireland wasn't a 15 hour car journey away. Partly because it's quite nice, and also because the journey was hateful. I came home and immediately slept for 12 hours straight.

I've spent the last week lazing about in the Ballyhoura mountains, cooking roast chicken for 12, and having lovely, friendly Irish people being lovely and friendly to me. 

For all those expecting a blog post about my various dinners out in high-class, traditional Irish establishments, I'm going to have to disappoint you. Unfortunately this was a holiday on a budget; which means this is a blog about excellent value-for-money lunches, visits to various butchers, and opportunistically grabbing as much free food as possible. 


Wedding Feastings 

I like being invited to weddings. I like seeing people happy and in love and surrounded by family and friends. I like dancing and laughing and singing along to the DJ until my throat is sore. 

I also like free food. 

My whole purpose of being in Ireland was actually to attend the wedding of one of T's close, childhood friends. The reception was held in the 4* Dunraven Arms Hotel in Adare, Co. Limerick; and it deserves a monumental shout-out because the 4-course dinner we were served was OUTSTANDING. 

Normally the food served at weddings is a bit hit and miss; sit-down meals featuring overcooked meat or undercooked vegetables which have been sweating under a heat bulb, or the soul-destroying Aunty's finger buffet with sausage rolls that you suspect shouldn't really be that grey colour. 

But lo, the Dunraven Arms Hotel served us excellent quality, locally sourced produce all cooked in-house and with a range of dazzling choices all up to and surpassing the kitchen's 2 AA rosette status. 


And special shout-outs go to... 


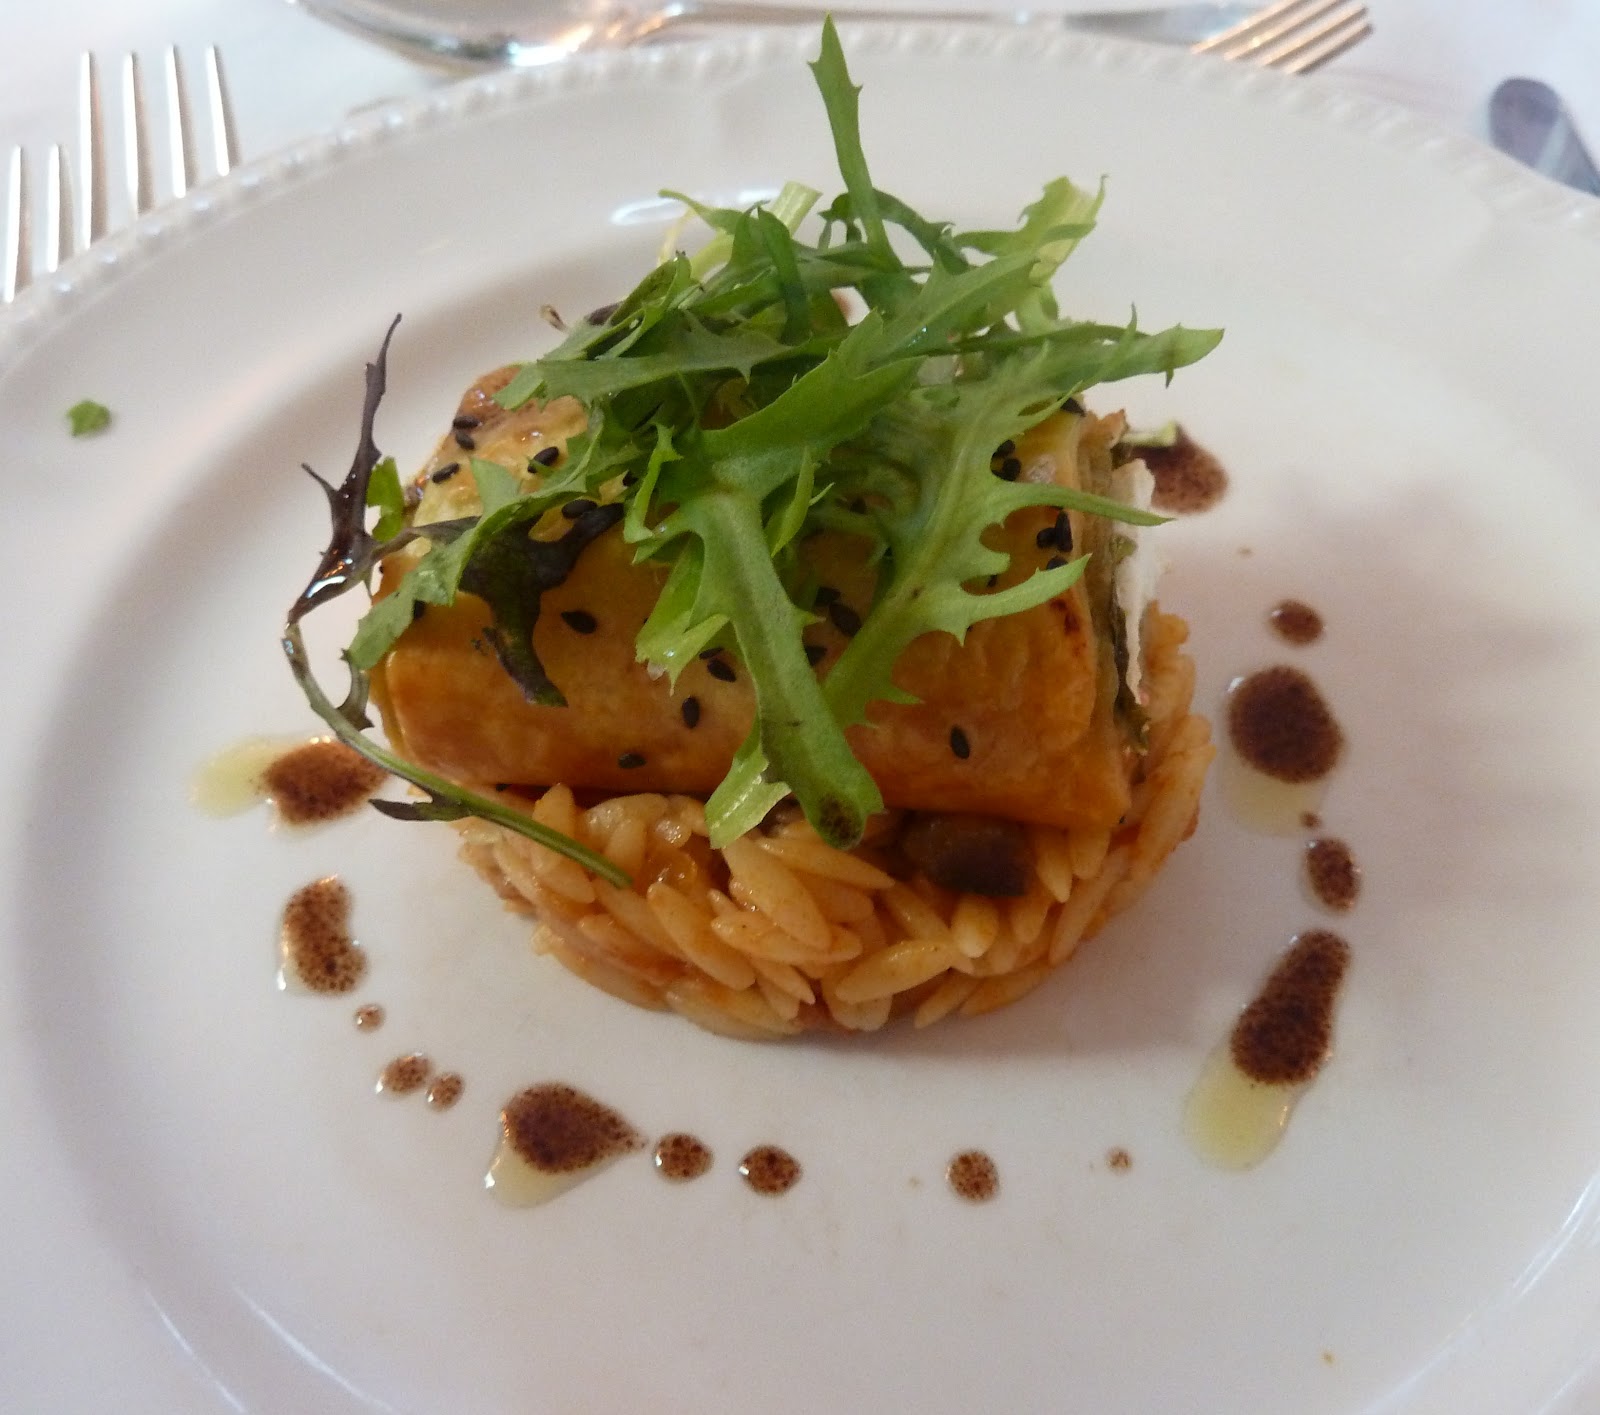
...the starter of goats cheese strudel with orzo pasta. The breadth of textures was so gorgeous that I had to hold myself back from flinging my face into the entire dish. Inside the crispy strudel was not only creamy, tangy goats cheese but also soft Mediterranean vegetables. And I've never had orzo pasta cooked so well; perfectly al-dente to a fault. 


...roast rib of beef with champ, puréed carrot, beef jus, and buttered sugersnap peas and green beans. The traditional Irish champ was just so tasty I tried to persuade my BFF to put the leftovers in her handbag for later. She refused. The beef was served to your request; I asked for medium rare, the resulting beef was almost mooing but I didn't care one bit because it was so tender I didn't even need a knife. And the beef jus was so super-concentrated, it was a pure hit of cow. 


...a trio of desserts; chocolate mousse, a miniature berry tartlet, and vanilla icecream. In mind the star of this show was the miniature berry tartlet; the pastry was just the right thickness and crunch, and the crème patisserie in the centre was unctuous. 


Post-Travel Burger Blow-out 

The journey to Ireland from Northamptonshire by car is long, draining, and ferries are hideously noisy and uncomfortable. 

Towards the end of the first-leg of our journey T was becoming increasingly frantic for a burger. All I wanted to do was sleep, but each to their own. 

As we rounded the corner and spotted our hotel on the horizon T cried out in joy at the sight of a neighbouring McDonalds; "It's not perfect, but it'll bloody do!". As we got nearer to the hotel, however, we spotted something else... 

1950's THEME DINER AHOY! 

T was so excited he was practically paralytic and started banging his fists on the back of the driver's seat with sheer, unadulterated elation; "PROPER BURGERS!" 

And so we ate at Eddie Rocket's, which was promisingly packed to the gills with locals and stashed full of 1950s charm. The ice-cream milkshakes were awesome; so thick that the straw stood to attention all by itself, and the best part was that you got the remainder of the shake in a metal jug to top yourself up! 


The burgers were all served in a no-nonsense paper sheath and the best bit about them, unusually, was the bun. The bun was showered with sesame seeds and had an outside crunch paired with a soft middle. 


The range of burgers on offer was incredible; I opted for a 1/3 pound pattie with swiss cheese, fried onions, and sautéed field mushrooms. And it hit the spot. The menu also offered American classics such as hot dogs, nachos, chicken wings, and fries smothered in cheese. 

Perfect comfort-food for the end of a looong day. 


Pork Shops

The Irish are serious about their meat. 

In every village, town, and street in a city you will find a butchers. Guaranteed. And that butchers will offer a mind-numbing range of locally sourced meat, poultry and game. Guaranteed. 

I love a butchers and the plethora of butchers in Ireland made me love the country a little bit more. 

I even found one in Limerick city which proudly declared itself as a... 


 Out of all the produce I tried I think the Irish pork was the best, and they're obviously passionate about it. 

Take this bacon from McCarthy's of Kanturk: 


It was expensive in terms of bacon, but really good value for a quality product. When fried it retained it's shape, there was no added water, and the taste was of 100% pig. A friend commented that it was the piggiest bacon he'd ever eaten. 


Deli-Cious 

A special mention for Cornstore at Home deli of Limerick city; a truly delightful place packed with local-produce. Their foccacia bread was the best I'd ever tried and they also offered a range of chilled ready-meals, provided by their sister restaurant, Cornstore. After experiencing a taste of Cornstore at Home I was desperate to visit the restaurant, but alas the budget didn't stretch that far :( 


Layabouts who Lunch 

We decided to return to the scene of the crimes against wedding dancing, the Dunraven Arms Hotel in Adare, for lunch during the week. Mostly because the food at the wedding reception was so darn good and we thought we'd treat ourselves to a little mid-week sophistication. 

We were the only guests, and I mean THE ONLY ONES, not wearing suits or pearls. Personally I had on jeans and walking shoes and in terms of sartorial style and social class I felt a little out of place. As we took to our table we thought we'd made a bit of a mistake and that we couldn't afford to be there. 

But how very wrong we were. Two courses of lunch and drinks (mine being an Archer's and Lemonade, my tipple of choice since the age of 18) came to an astoundingly reasonable 12 Euros a head. 

This hotel knows how to do soup. I had an amuse bouche of leek and potato at the wedding reception which was the best I'd ever had, and the trend continued with the vegetable soup I had for lunch that day. I still don't understand how they packed in so much flavour; must be witchcraft. I paired the vegetable soup with sandwiches of beef pastrami and roasted peppers. Gorge. 


Unfortunately I was left a little cold by the dessert of lemon tart; the pastry was too thick and had an odd crumbly texture, and the filling could have packed more of a sharp lemony punch. But the presentation was delightful and the couple of sprigs of lemon thyme were a lovely addition. And for 12 Euros a head it was still amazing. 


On a final note, here's me dancing with Paddy the Chicken... 


Wednesday 22 August 2012

Food Porn: Home-Made Italian Pizza


Tomorrow it's Holiday Eve! Like the night before Xmas; only with more frantic packing, list checking, and car sweet stockpiling. Car sweets are damn important. 

So today's been busy and I wanted something for dinner that was quick, easy, and that I could just slam into the oven at the end of the day. I chose to make proper pizzas from proper Italian dough. 

Clearly this wouldn't spring to mind for everyone thinking 'Quick, Easy Dinner', but pizza dough is brilliant because you spend a minimum amount of time preparing it and then leave it for pretty much the whole afternoon. 

Then there's the toppings, on in 3 minutes flat. And the cooking? 15-20 minutes in a hot oven. 

Yes yes, you could order a takeaway pizza or bung a frozen one in the oven. But this way is healthier, lighter, and, in T's humble opinion, much tastier. 


Ingredients to make dough for 2 8" pizzas: 

325g of '00' flour
Half a 7g sachet of yeast (3.5g) 
1 tsp of salt
2 tbsps of olive oil
3 tbsps of milk
Roughly 150ml of warm water 

You can either mix the dough by hand in a large bowl or in a food processor; it you want to make it easily and in less time, I recommend the food processor. 

Add the flour, yeast, salt (Tip: Keep the yeast and salt separate in the bowl as the salt will damage the yeast), oil, and milk into the food processor and mix together. While it's mixing slowly add the warm water until a dough forms. 

Remove the dough from the food processor, place onto a well-floured surface, and knead for around 5 minutes. The dough will start off a bit stiff but as you knead it will feel looser. After 5 minutes the dough will feel soft, smooth, and will be more elastic; if you poke the dough with your finger the indentation will spring back. 

Place the dough into a large bowl and cover with a clean, damp tea towel. Leave the dough for about an hour and a half to rise; in this time it'll double in size and will feel light and soft to the touch. 


Now for knocking the dough back (the fun bit). Take the dough out of the bowl and back onto a well-floured surface and then pummel it all over; it's cheap anger-management. Knead the dough again for a couple of minutes, shape into a ball, and place back into the bowl and cover with the tea-towel. This time leave the dough for another hour, and then it's ready to use. 

To make 2 pizzas divide the dough into two equal pieces using a knife, then shape each piece into a small ball. To shape the dough I use a combination of rolling and stretching; firstly roll out the dough with a rolling pin into a rough circle (Please note; my pizzas are never circular, I like to call them 'artisan'). Then stretch the dough; place one hand into the centre of the dough and use your other hand to stretch out the dough from the centre outwards, all the way round. It's up to you whether you make the base deep-pan or stretch it out further to create a thin and crispy base. You can also create a crust by rolling the edge of the pizza inwards all the way round. 

And there you go; pizza base ready. 

Basic pizza prep involves spreading tomato passata all over the base and adding mozzarella, and basil if you'd like. After that the toppings are up to you; you can go with the traditional to the out-there. Tonight I did one base with Hungarian pepperoni and sliced red chilli, the other with prosciutto and sliced chestnut mushrooms, and finished off both with grated parmesan. Try to add a bit of texture into your toppings so that your pizzas aren't flat and dull; I scrunch up the prosciutto and for an extra crunch add fennel seeds to the pepperoni. 

You can cook the pizzas a number of ways; either on a flat tray, a specialised stone, or straight onto the oven shelf. I prefer the oven shelf option as it makes the bottom of the base crispy without addition washing up, but remember to place a sheet of baking paper onto the shelf first under the pizza or it'll fall through the gaps! It's also easier to place your dough onto the baking paper/tray/stone before you add the toppings. 

Then cook in a 220c/220c fan oven for 15-20 minutes, until the base and edges of the pizza are crispy and the toppings are cooked. The resulting pizza base will be light, airy, with a good crunch! 


Tuesday 21 August 2012

Food Porn: Coconut Panna Cotta with Pineapple Salsa


I'm so very sorry that there haven't been any new posts for a while. This is because of two factors: firstly I've been busy planning and establishing my new catering business Earls Barton Eats! (EEP MY OWN BUSINESS!) and secondly my brain has been a bit all over the place recently and it can't seem to be able to focus on more than one thing at a time. 

For example, this morning I went shopping for the ingredients to create this panna cotta. I thought all was going fine until I got home and realised I'd forgotten the most important ingredient; coconut milk. 

So I returned to the supermarket once more and bought said coconut milk. Then got home again and realised I'd forgotten the second most important ingredient; pineapple. Stupid brain. 

So after three trips to the supermarket, here it is... 


Ingredients to serve 3-4: 

1 tin of full-fat coconut milk
200ml of full-fat milk
100g of caster sugar
1tsp of vanilla extract
1 sachet of powdered gelatine
1 small tin of pineapple chunks in juice (you can use fresh if in season)
1 lime
1 stick of lemongrass
5-6 mint leaves

This will be easier than you think, I promise. Panna cottas can understandably be intimidating because of the will it/won't it set drama. But get the ratio of liquid to gelatine spot on and you have nothing to worry about. 

Firstly gently heat the coconut milk, milk, caster sugar, and vanilla in a saucepan until the sugar has dissolved, then turn the heat up and bring to the boil. When boiled turn off the heat immediately. 

Pour 200ml of the hot liquid into a jug or bowl and sprinkle in the gelatine; always add gelatine to liquid not the other way around! Whisk together until the gelatine has dissolved then pour the 200ml of liquid back into the saucepan with the rest of the liquid and stir together. 

Immediately pour the liquid into dariole moulds, making sure you fill right up to the rim. It's useful to put the moulds into a tray before you start for easy transportation to the fridge, otherwise the moulds will be too hot to move easily after you pour the liquid in. These measurements will make roughly 3 1/2-4 panna cottas if you're using dariole moulds, but easily 4 if you're using ramekins. Place all the panna cottas into the fridge to set for at least 3 hours or ideally as long as you can up to 24 hours. 

To make the salsa pulse the lemongrass and mint together in a food processor and place into a bowl. Add the juice of half a lime and the zest of a whole one and mix together. Then add the pineapple chunks, drained of their juice, and mix all together. Place into the fridge for the pineapple to marinate for about an hour. 

When the panna cottas have set (they'll be firm on top and jiggly when you shake them) remove them from the fridge. For easy turning out dip each mould halfway into a bowl of boiling water for around 10-15 seconds, then place them onto the worktop and put a plate on top. While holding the mould to the plate, turn upside down. You might need to give the mould a bit of a shake to release the panna cotta but you can hear when they're released from the mould as they'll make a squelching noise. If they don't release first time, just dip the mould back into the boiling water for a few seconds. 

Serve on a plate with a spoonful of the pineapple salsa. The panna cotta will be glossy and creamy, working nicely with the fresh zing of the salsa! Perfect to finish off a spicy and hot South-East Asian meal. 


Friday 10 August 2012

Food Porn: Spinach and Ricotta Mezzaluna

Someone commented recently that my blog didn't feature many vegetarian recipes. Well I've had a look and it does appear that I am quite the carnivore. 

I partly apologise for this obsession with meat, but on the other hand I sort of don't because I find meat awesome; FLESH! 

BUT I do love vegetarian food; it's amongst my favourite things to eat, honest. AND I do cook vegetarian food quite a bit actually, I just haven't shared any of it. 

Until now... 


Ingredients to serve two and make about 30 mezzaluna

To make the pasta: 

190g of '00' flour
2 whole eggs and 2 egg yolks
2 tbsps of virgin olive oil
Salt

To make the filling and sauce: 

50g of ricotta cheese 
50g of parmesan, grated (Use vegetarian hard cheese if required)
1 whole egg
3 tbsps of spinach, finely chopped (I use frozen for freshness but you can use fresh if you'd like)
3 tbsps of mascarpone cheese
1 can of chopped tomatoes in juice
1 tsp of dried oregano
1 tbsp of basil, finely torn
1/2 a tsp of ground nutmeg
2 tbsps of olive oil
1tbsp of tomato puree
2 cloves of garlic, crushed
Salt and pepper


Right; PASTA! Making pasta is quicker and easier than you'd think, and I find that the taste of fresh pasta far exceeds that of dried. It will be easiest to use a pasta maker, which looks like a mini mangle, but you can roll your pasta out super thin with a rolling pin if you don't have one. 

I find it easiest to make the pasta in one batch at a time. Start with a clean, cool surface (I use the work surface covered in greaseproof paper) and make a mountain shape out of 95g of '00' flour. Then make it into a volcano by making a well in the middle with your fingers. Into this well crack a whole egg and an egg yolk, and add 1 tbsp of virgin olive oil and a 1/4 of a tsp of salt. 

Then, using your hands, draw the floury sides of the volcano into the well in the middle and mix the flour together with the wet ingredients. Once the wet and dry are mixed together into a sticky lump you can start kneading this into dough, using your hands this will take about 10 minutes. The dough should end up smooth and silky to touch. Make sure that you flour the surface with a sprinkle of '00' as you go or the dough will be too sticky. 

When your dough is kneaded wrap in cling film and set aside in a cool place for 30 minutes; if it's a warm day it's best to put it in the fridge. Repeat for the second batch. 

For the filling first sauté your spinach for a couple of minutes in a saucepan with a knob of butter and then wring out any water. Whisk the egg in a large bowl and beat in the ricotta, parmesan, nutmeg, seasoning, and then the spinach until mixed together. Place in the fridge to firm up while you roll out your pasta. 

If you've left your pasta in the fridge remove it 5 minutes before you plan to roll it out to allow it to return to room temperature. If you're using a pasta machine set it up at one end of a long section of working space, as the pasta will get very lengthy when it's rolled out thinly. 

Start with one batch of the dough and shape it in your hands into a rough rectangle. Set your pasta machine on the thickest setting and roll the dough through. Then move on to the next setting down and roll out once more; repeat until you've rolled out the pasta on the thinnest setting. Make sure once again that the surface is well floured with '00' to prevent the pasta from sticking. 

Once the pasta is rolled out to it's thinnest take a round cutter (about 8cm in diameter is ideal) and cut out the rounds of pasta to make the mezzaluna. You can cut out as many as possible but each batch should make about 15 rounds. Place the rounds on a well-floured tray to dry a little before filling. 


To make the sauce place the tomatoes, garlic, oregano, tomato puree, and olive oil into a pan and bring to the boil. Then turn the heat down to low and simmer for about 30 minutes until the sauce is reduced. When the sauce is thick add the seasoning, basil, and mascarpone and stir in thoroughly. 

To fill the mezzaluna place about 1/2 of the filling mixture in the middle of one side of the pasta round. Using your finger smooth a little water all around the edge of the pasta round. Then roll that side of the pasta over, away from you so that the filling is neatly in the middle, into a half-moon shape. Then press down the edges firmly from the middle outwards, so that any air is expelled. Pick the mezzaluna up to make sure the edges are sealed down properly otherwise it may burst open when cooking. Place the mezzaluna back onto a well-floured tray. Repeat for all the pasta rounds. 


Boil some water in a large saucepan and add a little sea salt. I find it really helpful to use a small frying basket placed in the saucepan to cook the mezzaluna in, as they're far easier to remove when they're cooked. Otherwise you can gently place the mezzaluna into the saucepan of boiling water one at a time. They'll only take a couple of minutes to cook; you'll know when they're done because they'll float to the top of the water. 

In a deep pasta plate spoon a little of the sauce in the bottom, then when the mezzaluna are cooked serve them on top of the sauce. You can then spoon a little bit more of the sauce on top of the mezzaluna and finish off with more grated parmesan if you'd like. 


VEGETARIAN NOM. 


Food Porn: Layered Cheesecake Bites

You must think I'm obsessed with making food that's square. Really I'm not, I make round food too and sometimes dodecahedron if the mood takes me. 

Recently every week I've been baking for T's colleagues because they're hard-working chemists and need sweet sustenance on a Friday morning. Baking bite-size delights in a rectangular tray and then serving cut into squares is the best way to feed a crowd like this. 

This recipe is for a New York style baked cheesecake, because frankly they're the best kind. 

Ingredients to make one batch in a 20cm x 30cm tray: 

600g of soft cream cheese
250g of mascarpone
225g of digestive biscuits - substitute for GF digestives if required
100g of unsalted butter, melted
2 whole eggs, plus 2 egg yolks
175g of caster sugar
4 tbsps of self raising flour - substitute for GF self-raising flour if required
2 tsps of vanilla extract
200g of milk chocolate

First preheat the oven to 180c/160c fan and line the tray with greaseproof paper, leaving an inch around the top to make it easier to lift out the cheesecake afterwards. 

Now the fun bit - smashing up the digestives! You can use a food processor on pulse, but I prefer to put all the biscuits into a large bowl and smash with the end of a rolling pin. This way you end up with little chunks of biscuit in amongst the crumbs and this gives the base a better texture. Plus it's a great bingo-wing workout. 

When the biscuits are crushed add the melted butter a little at a time and mix well. You should reach the consistency where if you press the back of a spoon against the biscuit it leaves an indentation. Then tip the biscuits into the base of the tin and press down firmly in an even layer. Place in the oven and bake for 5 minutes to firm up, then remove and set aside to cool. 

Melt the chocolate in a bowl over a saucepan of simmering water, then remove the bowl from the pan and set aside to cool. 

In a large bowl beat the eggs and sugar together until smooth then add the cream cheese, mascarpone, vanilla, and flour. Beat together until the mixture is smooth and silky and then divide half the mixture into another bowl. When the chocolate is cool add into one half of the mixture and fold in thoroughly with a spatula. 

Tip two thirds of the chocolate mixture onto the biscuit base and smooth out into an even layer with a spatula. Then tip the vanilla mixture onto the top and spread out carefully into a layer; some of the vanilla will sink down into the chocolate but this is perfectly OK! 

Tip the remaining chocolate mixture in a line down the middle of the vanilla layer. Take a bamboo skewer and sink into the cheese down to the biscuit base. Then swirl the skewer around the cheese in circles, mixing the chocolate with the vanilla, in order to marble the top of the cheesecake. 

Bake in the oven for 25-30 minutes, until the cheesecake has a slight wobble when you gently shake it. Turn the oven off and leave the cheesecake inside to cool for at least 2 hours; this will make the cheesecake dense and creamy. 

When completely cooled remove the cheesecake from the oven and cut into squares! 


Thursday 2 August 2012

Food Porn: Cherry Bakewell Squares

I really love food that looks jolly; forget Michelin-style presentation.

Take the cherry bakewell square: 


Doesn't it just make you smile? I think it's the shiny, patent cherry on top of the white icing; it reminds me of a clown's nose (Apologies to those terrified of clowns). 


I might even rename them 'Cheery Bakewells'. 

WARNING: This is not a nut-free recipe; it is truly packed to the gills with almonds. 

Ingredients to make one batch in a 20cm square tin: 

300g of shortcrust pastry; either ready-made or you can make your own using a gluten-free recipe like this.
1 jar of morello cherry jam
100g of ground almonds
100g of self-raising flour; for gluten-free substitute for GF self-raising flour
4 large eggs
200g of golden caster sugar
200g of unsalted butter, softened
1 tsp of French almond extract
200g of icing sugar
20 glacé cherries
Cold water

Firstly line the baking tin with greaseproof paper, leaving an inch around the top to make it easier to lift out the cherry bakewell afterwards. Preheat the oven to 200c/180c fan. 

Roll out the pastry to around 1/4cm thick and cut it to the size of the tin; you can do this either by placing the tin on top of the pastry and trimming round it or making a template out of greaseproof paper. Then place the pastry in the bottom of the tin and press down gently round the sides. Spread the jam all over the pastry, making sure every bit is covered evenly. 

Beat together the sugar and butter in a large bowl until smooth, then beat in one egg at a time with 1 tbsp of the ground almonds. When you've beaten in all 4 eggs add the remaining almonds, the flour, and the almond extract and fold in with a spatula until the mixture is smooth and resembles a thick batter. Spoon the mixture over the jammy pastry and spread evenly with the spatula. Place in the oven for 35-40 minutes until the sponge is risen and golden brown. 

When the sponge is cooked, remove from the oven and set aside to cool in the tin. In a small bowl mix together the icing sugar with around 4 tbsps of cold water until it resembles a thick, gloopy paste; make sure there aren't any lumps of icing sugar! When the sponge is cooled spread the icing all over the top with a spatula, making sure that every bit of sponge is covered evenly and none of the sponge is showing through the icing. Place the glacé cherries on top and evenly space them out to be in the middle of where you'll cut the squares later. Then put the entire cherry bakewell in the fridge for at least 2 hours for the icing to set. 

When the icing is set remove the cherry bakewell from the tin and cut into squares, then consume the joy!